Hyper-V Virtual Switch Explained
The Hyper-V virtual switch is one of the biggest sticking points for newcomers to the hypervisor. This post only covers the virtual switch and the connection of the management operating system to the physical network. There are three switch modes:
- Private Switch – allows communications among the virtual machines on the host and nothing else. Even the management OS can’t communicate with the VMs. This switch is purely logical and does not use any physical adapter in any way.
- Internal Switch – is similar to the private switch with one exception: the management operating system can have a virtual adapter on this type of switch and communicate with any virtual machines that also have virtual adapters on the switch.
- External Switch – must be connected to a physical adapter. It allows communications between the physical network, the management operating system and virtual machines.
Private and Internal Switch Concept
The private and internal switches are not connected to a physical switch in any way, so they are unbound from most of the limitations imposed on physical network equipment. A virtual adapter on a private switch can communicate with other adapters on the same switch at the speed of the physical host’s system bus. The communications aren’t without cost. These are virtual network adapters and are still governed by the need to pass network protocols. Packet processing requires the same CPU resources as a physical adapter and, without the physical path as a bottleneck, this packet processing might become a measurable burden on your system in a way that gigabit networking never could be.
The thing to keep in mind is that private and internal switch communications cannot leave the physical host. If you set up two virtual machines so that they connect over a private switch and then one of those is Live Migrated to another host, the communications link will be broken. Because the Hyper-V switch is extensible, it is possible for this limitation to be overcome by supporting software, but Hyper-V cannot do it alone.
External Virtual Switch Concept
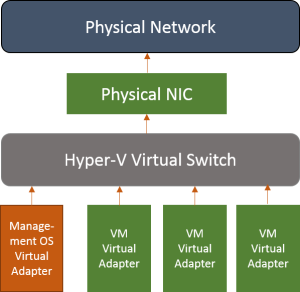
In short, this image explains how the external switch works:
The above is the way that the external switch always works. You can choose to allow or disallow the management OS to use this switch to access the network by selecting the “Allow management operating system to share this network adapter” option in the Hyper-V Manager GUI or by adding the “-AllowManagementOS” when issuing “New-VMSwitch” command in the PowerShell. If you disallow the management OS to use this virtual switch, the orange “Management OS Virtual Adapter” will not be created. That physical NIC is never used for any other purpose except hosting the virtual switch. If you’re connected in remotely via that adapter, this doesn’t work because the process necessarily involves a disconnect.
When you try to use Hyper-V Manager from a remote system to create a virtual switch on a host and set that Allow option, the Hyper-V Manager stops responding. It is because the IP settings are unbound from the physical adapter, the virtual switch is activated on it, a new virtual adapter for the management operating system is created, and the IP settings are assigned to it.
In 2012, if you opt to create the virtual switch but don’t choose the option to “share”, there’s nothing stopping you from using PowerShell to immediately create a virtual adapter on the switch. In either version, you can immediately check the “Allow” box in Hyper-V Manager. The “allow” wording, unfortunately, doesn’t actually mean “allow”. It just means “create a virtual adapter right now and designate it for the management operating system”. In fact, if you don’t initially set “allow” but use PowerShell to attach a virtual adapter for the management operating system later, you’ll find that these options have been set to True.
Isolation
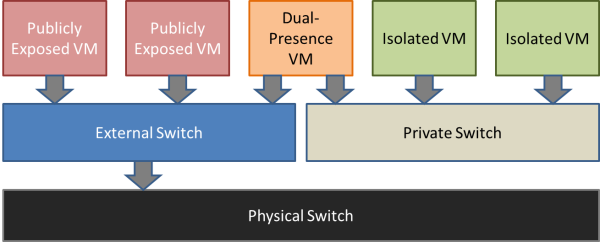
Since the private and internal switches aren’t connected to a physical adapter, they are naturally isolated from anything not attached to the virtual switch. You can route the traffic between the private and the external switches by using a software router inside a VM connected to both switches (if you don’t want to expose the VMs connected to the private switch.
The system with RouterOS installed could perform routing to indirectly connect the isolated VMs to the physical network. You can also use the NAT feature to provide an even greater level of isolation. You can also configure a DHCP in the RouterOS and allow it to service that network, or use DHCP relay.
Creating the switches
“New-VMSwitch” is the command that creates a switch. It only has a few options. External switches must be created on one physical adapter or a team of physical adapters that is not used in any other virtual switch. Use “Get-NetAdapter” to list the adapters in the system. The Name field is what you’re looking for to create an external switch.
PS C:> get-netadapter

Name                      InterfaceDescription                    ifIndex Status       MacAddress             LinkSpeed
----                      --------------------                    ------- ------       ----------             ---------
Ethernet 1                Intel(R) Ethernet Server Adapter I...#2      16 Disconnected A0-36-9F-5E-96-79          0 bps
Ethernet 2                Intel(R) Ethernet Server Adapter I35...      15 Disconnected A0-36-9F-5E-96-78          0 bps
Ethernet 3                Intel(R) I210 Gigabit Network Conn...#2      14 Up           90-1B-0E-10-AD-D1         1 Gbps
Ethernet 4                Intel(R) I210 Gigabit Network Connec...      13 Up           90-1B-0E-10-A6-06         1 Gbps

PS C:>
The following is an example creation command:
New-VMSwitch -Name "vSwitch" -NetAdapterName "Ethernet 3" -AllowManagementOS 0
Note that if you want to use a private or internal switch, you have to use the “-SwitchType” variable with one of those two options. That parameter is not used in the above example because the inclusion of the “-NetAdapterName” parameter automatically implies that the switch is of external type. Setting “AllowManagementOS” to 0 just means that no virtual adapter is created at this point. If you set it to 1, you’ll have a virtual adapter in the management OS that you’ll need to set configuration on.
To create a virtual adapter in the management operating system, you must use PowerShell. An example:
Add-VMNetworkAdapter -SwitchName "vSwitch" -ManagementOS -Name "LiveMigration"
Note that the OS sees this new virtual adapter with a name of “vEthernet (name you used)”. That is the name you need to pass into any networking command that doesn’t include “VM” in the noun portion, such as “New-NetIPAddress”.
The Hyper-V virtual switch is 802.1q-compliant and adapters attached to virtual machines and the management OS can be assigned to a VLAN. The virtual switch will trunk inbound and outbound packets properly. Setting the VLAN on a VM-connected adapter can be done through the VM’s properties in Hyper-V Manager or PowerShell can be used with the “Set-VMNetworkAdapterVLAN” command.
Set-VMNetworkAdapterVlan –ManagementOS –VMNetWorkAdapterName "LiveMigration" -Access –VlanId 10
There are many more options available for this particular command, but most of them are for advanced purposes, such as in a multi-tenanting environment.
It is important to note that for virtual adapters on a highly available virtual machine to be able to continue connecting after a migration, it must connect to a virtual switch with the same name on each host. The exception is if it is assigned to a Network Resource Pool. Then, the pool name must be identical on all hosts.

